Illustrator How to Continue Path With Pen Tool
Drawing with the Pen Tool
I always suggest taking the following preparatory steps before new users start drawing with the Pen tool:
- Later you'll see how Illustrator's smart guides can be helpful when working with the Pen tool, but initially they're too distracting. Since the smart guides are turned on by default, turn them off by choosing View > Smart Guides or pressing Ctrl-U (Windows) or Cmd-U (Mac) and making sure that the smart guides are deselected.
- When you start drawing with the Pen tool, it can be rough to draw when the path has a fill, so let's make it a little easier. Select the Pen tool; then change the Fill color to None and the Stroke Color to black in the control panel.
We'll begin by working with a straight path and then gradually move toward more complex shapes, using keyboard commands and various tools as we go along. Each bold objective in the following tutorial will be followed by specific instructions on how to get the described result. I've also included a video for each objective, which you can view to see the process in action.
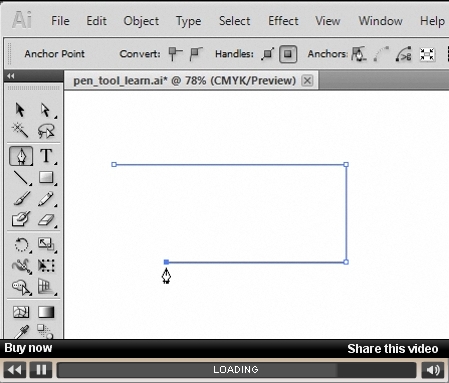
Draw a straight line that's perfectly horizontal or vertical (video 1).
- With the Pen tool selected, position the pointer away from any other paths that you've drawn. Click once on the artboard to set a point. Position the pointer somewhere to the right of the original point, hold down the Shift key, and click again. Holding down Shift as you create the path makes the line perfectly horizontal.
- Position the pointer somewhere below the point you just created. Hold down the Shift key and click to create the third point of the path. Notice that the line you just created is perfectly vertical because you held down the Shift key.
- Press P to stop drawing the previous shape. This action creates what's called an open path, because the shape you created isn't closed, like a circle or square would be. To create a closed path, you could position the pointer over the original point and click to close the path. If you try it, watch the shape of the pointer. As you hover over the first point, the pointer shape changes to display a circle with the Pen tool, indicating that clicking there would create a closed path.
 Optional content (will be overwritten by Flash movie)
You need to upgrade your Flash Player. You need version 9 or above to view this video. You may download it here. You may also see this message if you have JavaScript turned off. If this is the case, please enable JavaScript and reload the page.
Video 1
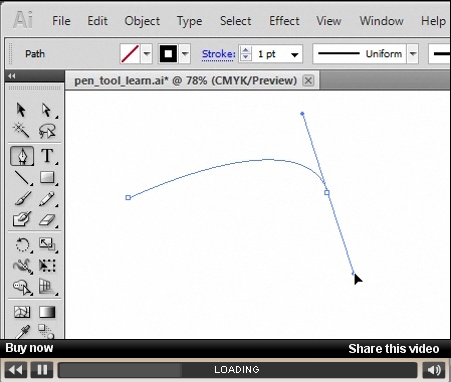
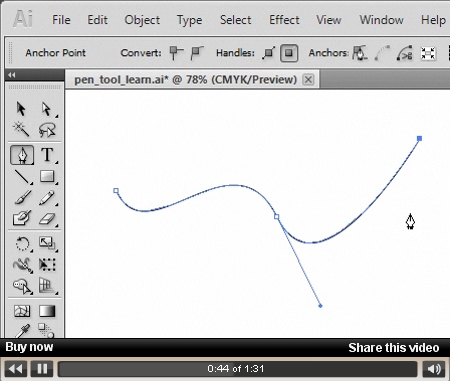
Draw a curved shape (video 2).
- With the Pen tool selected, position the pointer away from the previous path you drew. Click once on the artboard to set a point.
- Position the pointer to the right of the original point, click, and then drag away from the second point, without releasing the mouse button. Drag up, down, left, and right to see the effect on the path. Release the mouse button, and you have a curved path.
- Press P to stop drawing the previous shape.
As you drag away from a point with the Pen tool, you create direction lines for an anchor point. These direction lines control the direction of a curve and the arc of the curve.
 Optional content (will be overwritten by Flash movie)
You need to upgrade your Flash Player. You need version 9 or above to view this video. You may download it here. You may also see this message if you have JavaScript turned off. If this is the case, please enable JavaScript and reload the page.
Video 2
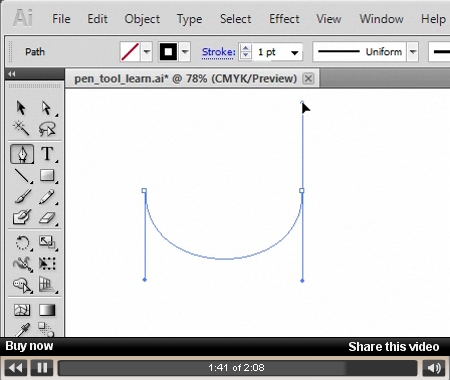
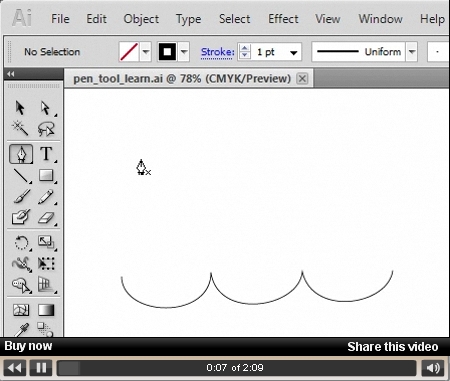
Create a U shape with the Pen tool (video 3).
- First, turn on the smart guides by choosing View > Smart Guides. When you're more experienced at drawing with the Pen tool, you'll probably turn the smart guides on and off a lot, depending on whether you need to align points as you draw.
- With the Pen tool selected, position the pointer away from any previous paths you drew. Click once on the artboard to set a point; then drag down, without releasing the mouse button. Hold down the Shift key and drag down a little more. Notice that the direction line snaps to vertical. Drag the pointer an inch or two from the point you set; release the mouse button and then the Shift key.
- Position the pointer directly to the right of the original point, until a horizontal green alignment guide appears when the pointer is aligned with the first point (that's part of the smart guides helping you). Hold down the Shift key, click, and drag up from the second point without releasing the mouse button. Drag up, down, left, and right to see the effect on the path. Release the mouse button and then the Shift key, and you have a U-shaped path.
- Choose Edit > Undo Pen to remove the last point created. (Instead of redrawing a path, you can undo a series of points created.) Redraw the last point.
- Press P to stop drawing the previous shape.
 Optional content (will be overwritten by Flash movie)
You need to upgrade your Flash Player. You need version 9 or above to view this video. You may download it here. You may also see this message if you have JavaScript turned off. If this is the case, please enable JavaScript and reload the page.
Video 3
- With the Pen tool selected, position the pointer away from any previous paths you drew. Click once on the artboard to set a point.
- Position the pointer below the original point. Click and drag down from the second point, but don't release the mouse button yet. Hold down the Spacebar and drag the mouse (you're still pressing the mouse button). Notice that you can drag the last point you drew to reposition it. Release the mouse button and then the key. Continue drawing with the Pen tool.
- Press P to stop drawing the path.
 Optional content (will be overwritten by Flash movie)
You need to upgrade your Flash Player. You need version 9 or above to view this video. You may download it here. You may also see this message if you have JavaScript turned off. If this is the case, please enable JavaScript and reload the page.
Video 4
- Turn off smart guides by choosing View > Smart Guides. Select the Direct Selection tool in the Tools panel, and then reselect the Pen tool. (In a second, I'll explain why you did that.)
- With the Pen tool selected, position the pointer away from any previous paths you drew. Click once on the artboard to set a point and drag down to start a curve.
- Position the pointer to the right of the original point; click and then drag up from the second point. Hold down the Ctrl (Windows) or Cmd (Mac) key to access the last selected Selection tool temporarily (the Direct Selection tool or "white arrow"). Position the pointer over the last point; then click and drag it to another position or drag the direction lines. Release the key and then continue drawing with the Pen tool.
- Press P to stop drawing the path.
 Optional content (will be overwritten by Flash movie)
You need to upgrade your Flash Player. You need version 9 or above to view this video. You may download it here. You may also see this message if you have JavaScript turned off. If this is the case, please enable JavaScript and reload the page.
Video 5
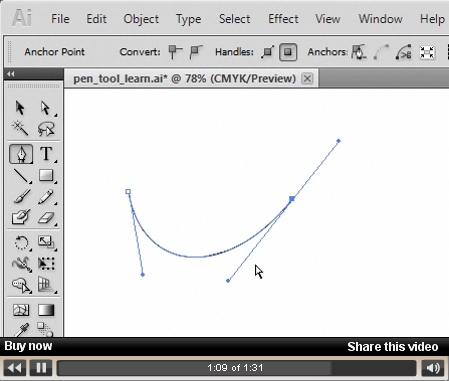
Convert points from smooth to corner as you draw (video 6).
- With the Pen tool selected, position the pointer away from any previous paths you drew. Click once on the artboard to set a point and drag down to start a curve. Release the mouse button.
- Position the pointer to the right of the original point. Click and drag up from the second point and release the mouse button when you've created a curve.
- Hold down the Alt (Windows) or Option (Mac) key. The pointer turns into the Convert Anchor Point tool. With the key still held down, position the pointer over the direction handle you dragged away from the point, and drag to "split" the direction handles. This action allows you to convert the point to a corner point with direction lines.
- Release the mouse button and then the key, and continue drawing with the Pen tool.
- Press P to stop drawing the path.
 Optional content (will be overwritten by Flash movie)
You need to upgrade your Flash Player. You need version 9 or above to view this video. You may download it here. You may also see this message if you have JavaScript turned off. If this is the case, please enable JavaScript and reload the page.
Video 6
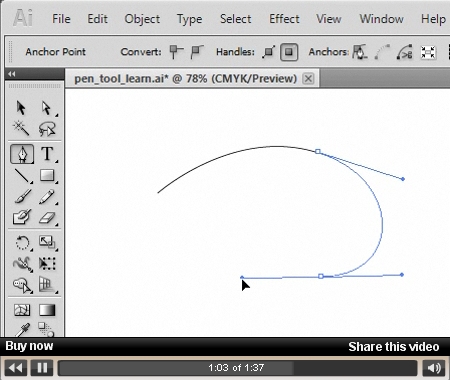
Create a curve, followed by a straight line (video 7).
- With the Pen tool selected, position the pointer away from any previous paths you drew. Draw a curve that consists of two points with direction lines.
- After dragging the mouse away from the second point and releasing the mouse button, position the pointer over the last point. The pointer now displays an upside-down v. Click the last point; the direction line you dragged out is deleted.
- Position the pointer to the right of that anchor point and click without dragging. You've created a curve, followed by a straight line.
- Press P to stop drawing the path.
 Optional content (will be overwritten by Flash movie)
You need to upgrade your Flash Player. You need version 9 or above to view this video. You may download it here. You may also see this message if you have JavaScript turned off. If this is the case, please enable JavaScript and reload the page.
Video 7
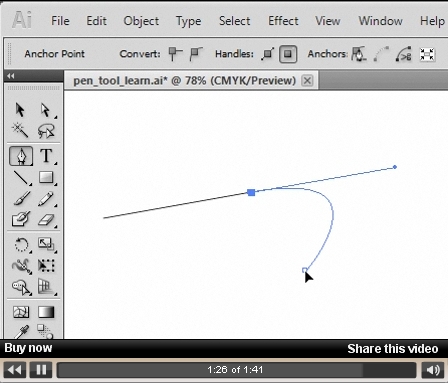
Create a straight line, followed by a curve (video 8).
- With the Pen tool selected, position the pointer away from any previous paths you drew. Draw a straight line that consists of two points without direction lines.
- After creating the second point and releasing the mouse button, position the pointer over the last point. The pointer displays an upside-down v. Click and drag from the last point to pull out a new direction line. Drag it in the general direction that the curve will go. Position the pointer to the right of that anchor point; then click and drag away to create a curve.
- Press P to stop drawing the path.
 Optional content (will be overwritten by Flash movie)
You need to upgrade your Flash Player. You need version 9 or above to view this video. You may download it here. You may also see this message if you have JavaScript turned off. If this is the case, please enable JavaScript and reload the page.
Video 8
Return to an existing path and add to it (video 9).
- At some point you'll undoubtedly draw a path and then want to continue it later. With the Pen tool selected, position the pointer away from any previous paths you drew. Draw a straight line that consists of two points without direction lines.
- Press P to stop drawing the path.
- With the Pen tool selected, position the pointer over the last point drawn. Notice that the pointer now displays a slanted line next to the Pen tool. Click the point, and you can continue drawing. If you want a curve, drag a direction line from the anchor point first, and then continue drawing points. Otherwise, just continue to draw anchor points.
- When you're done adding to the path, press P to stop drawing.
 Optional content (will be overwritten by Flash movie)
You need to upgrade your Flash Player. You need version 9 or above to view this video. You may download it here. You may also see this message if you have JavaScript turned off. If this is the case, please enable JavaScript and reload the page.
Video 9
wildeswalortromers1993.blogspot.com
Source: https://www.adobepress.com/articles/article.asp?p=1652772&seqNum=3
0 Response to "Illustrator How to Continue Path With Pen Tool"
Post a Comment